Home assistant add-on: Organizr
I maintain this and other Home Assistant add-ons in my free time: keeping up with upstream changes, HA changes, and testing on real hardware takes a lot of time (and some money). I use around 5-10 of my >110 addons so regularly I install test machines (and purchase some test services such as vpn) that I don't use myself to troubleshoot and improve the addons
If this add-on saves you time or makes your setup easier, I would be very grateful for your support!
Addon informations


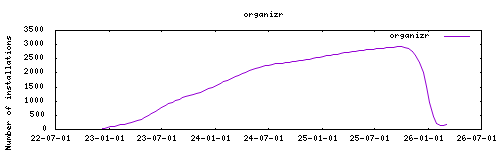
Thanks to everyone having starred my repo! To star it click on the image below, then it will be on top right. Thanks!

About
An HTPC/Homelab services organizer that is written in PHP. This addon is based on the docker image from linuxserver.io.
Installation
The installation of this add-on is pretty straightforward and not different in comparison to installing any other Hass.io add-on.
- Add my add-ons repository to your home assistant instance (in supervisor addons store at top right, or click button below if you have configured my HA)

- Install this add-on.
- Click the
Savebutton to store your configuration. - Start the add-on.
- Check the logs of the add-on to see if everything went well.
- Carefully configure the add-on to your preferences, see the official documentation for for that.
Configuration
Use the add-on env_vars option to pass extra environment variables (uppercase or lowercase names). See https://github.com/alexbelgium/hassio-addons/wiki/Add-Environment-variables-to-your-Addon-2 for details.
Webui can be found at http://homeassistant:80 or through the sidebar using Ingress. Configurations can be done through the app webUI, except for the following options.
Setup Steps
- Start the addon and access the web interface
- Follow the setup wizard to create admin account
- Configure your services and tabs through the web interface
- Database files are stored in
/data/directory
Options
| Option | Type | Default | Description |
|---|---|---|---|
PGID |
int | 0 |
Group ID for file permissions |
PUID |
int | 0 |
User ID for file permissions |
Example Configuration
PGID: 1000
PUID: 1000
Note: Organizr requires minimal configuration through the addon options. Most settings are configured through the web interface including service integration, authentication, and theming.
Support
Create an issue on github
Illustration
